0
items in Cart
We're taking a look at another ACNH Super Mario Crossover item - Floating Block and seeing how it can be used to build things like tunnels, caves, and shrines in Animal Crossing New Horizons.
Thanks to the latest ACNH 1.8 Super Mario update that introduced a whole bunch of Super Mario crossover items, we now have a brand new item such as the floating blocks and question mark blocks. These floating blocks are quite unique in that they allow us to place them down but still pass underneath them, it can be considered a new feature but they're not too dissimilar to archways. Anyway with using the floating block, for example, it's now possible to create all-new kinds of structures around the Animal Crossing New Horizons island, including things like tunnels, caves, and shrines, or basically anything you need a roof for. With this in mind, it'd be fun to show a couple of examples of how these can be used. Surely, before using them to build special areas on your island, you should prepare some of these items - new Animal Crossing items are hot sale on GOLDKK.COM at the cheapest prices now.
The easiest demonstration of these awesome new items is to build a tunnel following these steps:
1. Decide Where You Want a Tunnel
For example, you can use the path that leads down to your secret beach because it seems perfect for this kind of thing, but really it can be any size and anywhere you want. If you don't have an existing area, you can build your tunnel around you can easily terraform one, we'll cover this more in the cave example later.
2. Place Singe Blocks Down Around The Upper Cliff Edges
Once you have the location, the best thing to do is place a bunch of single blocks down around the upper cliff edges of the tunnel, it's not mandatory but does help to create the illusion of a tunnel as it covers any gaps left by the floating blocks.
3. Place Floating Blocks Within The Top Of Tunnel
Once the blocks have been positioned, the final thing to do is place a bunch of floating blocks within the tunnel itself which will basically create the tunnel. This can be a bit tricky, it would take you quite a while to get used to placing these, because of the angle of the camera but eventually, you'll be able to place these floating blocks in line with the normal ones.
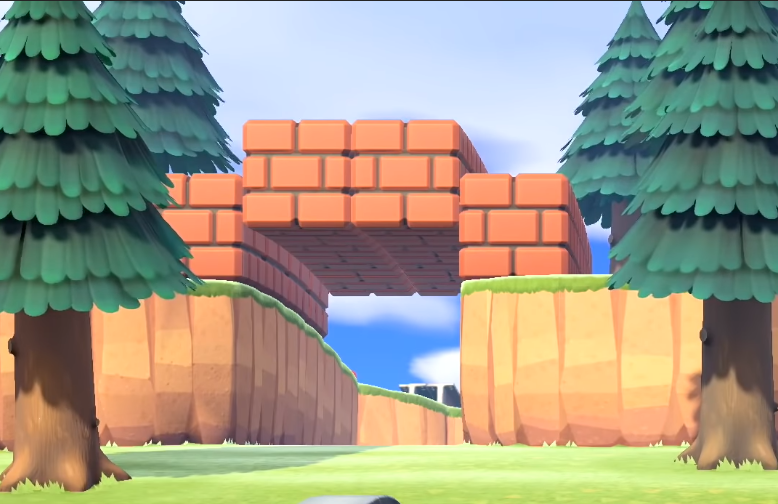
Note: Once all of the floating blocks have been positioned, you'll see the advantage of using the normal blocks on the upper cliffs because the floating blocks are slightly higher than the cliff edges.
The next example of how these floating blocks can be used is a more enclosed space such as caves or shrines, you can think of it as an outside room. Any way to create a cave by following these steps:
1. Terraform a Large Cliff
Terraform a large cliff to begin with and then basically dig out an area within the cliff that will essentially be the interior of your cave
2. Decorate The Cave Floor
Once you're happy with the layout you need to place a path using the island designer app, if you want a floor design you need to do this first because once the floating blocks are positioned above, you can't add it without removing them first.
3. Place Single Blocks Around The Upper Cliff Edges
Place any blocks on the cliff above first because it's so much easier to see what's going on before the floating blocks are placed. Given this is basically an enclosed space, you can use 11 blocks to create two sides and a back.
4. Decorate The Surrounding Area On The Cliff
Before the floating blocks are positioned, it's a good idea to decorate the surrounding area so while still on the cliff above. You can plant some adult trees right next to the blocks, it's as easy as digging some holes and planting them, which helps to create an immersive cave-like enclosure.
5. Place Floating Blocks On The Top Of Cave
Once you're happy with everything else, it's just a matter of placing the floating blocks inside the cave and above the path to create the roof.
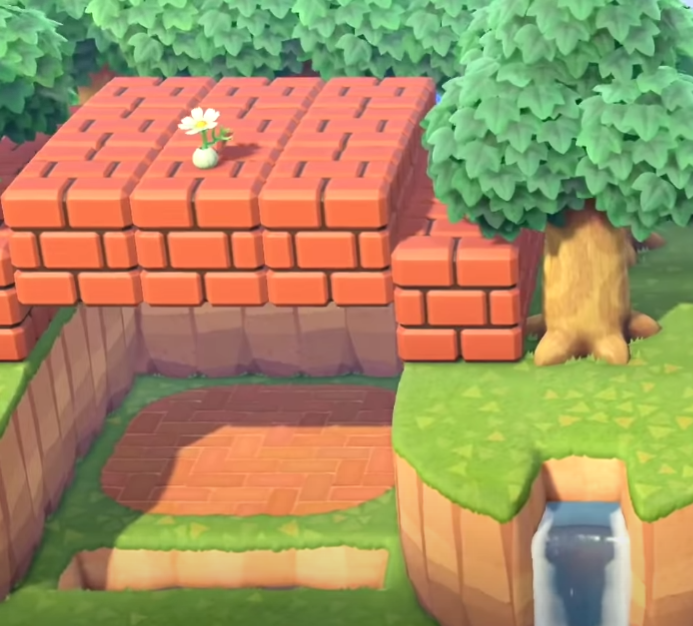
Note: There's no limit on this you could cover your entire island if you wanted to, and that's pretty much it you can then drop a lamp or something to make it a little cozier. Caves like this tend to look even better at night and is almost certainly a perfect place for wisp to spawn. Anyway, that's all there is to it you can continue to decorate the outside and even place smaller items on top of, these blocks if you want to, there's really no limit to how creative you can get with these items.
So there we have it that was two simple examples of how you can use these new floating blocks, if you want to learn how to use warp pipes effectively, check out our Best Animal Crossing New Horizon Warp Pipe Using Tricks.
